
Little Greene have released a new colour range Sweet Treats, to go with this new range they have released recipes relating to the new colours.
Little Greene Madeleine 338

Makes about 24
- 125g unsalted butter
- 125g caster sugar
- 2 large eggs
- 1 tsp vanilla bean paste or ½ tsp vanilla extract
- 125g plain flour
- 1 tsp baking powder
- A pinch of fine salt
- Icing sugar, chopped pistachios and dry edible rose petals, to decorate
- Melt the butter in a small pan or in the microwave, then set it aside to cool to room temperature.
- Whisk the caster sugar, eggs and vanilla together in a large bowl, until light and slightly thickened. Sift in the flour, baking powder and salt then fold using a large metal spoon until the mixture is well combined. Now fold in the cooled, melted butter.
- Cover the mixture and chill in the fridge for at least 1 hour or ideally overnight.
- To bake the madeleines, butter a non-stick madeleine tin with melted butter using a pastry brush, then flour it. Chill the tin in the fridge or freezer while you preheat the oven. You can skip this step if you’re in a hurry, but baking in a cold tin with cold batter will help the cakes rise with the classic madeleine domed top.
- Preheat the oven to 180°C, 160°C Fan, Gas Mark 4. Fill each indentation with 1 tbsp cake mix, or until half full. Don’t be tempted to smooth the mixture out, it will relax into the tin on its own – another tip that will help achieve that dome. Bake for 8-10 minutes until set and golden, with a pale top and light brown, scalloped base. Set aside to cool slightly in the tin. You can now prepare the tin to bake another batch, or save the remaining batter in the fridge to cook later.
- They are great eaten warm, with a light dusting of icing sugar. Alternatively make a thick icing by mixing some water or lemon juice into icing sugar. Brush onto a corner of the cooled madeleines then scatter with chopped pistachios and dry edible rose petals.
Bombolone 339

Makes 10 doughnuts
- 420g plain flour
- 30g caster sugar, plus extra for coating
- ½ tsp fine salt
- 14g dry active yeast
- 220ml semi-skimmed milk, lukewarm
- Finely grated zest of 1 large orange
- 2 large eggs, lightly beaten
- 40g unsalted butter, softened
- Vegetable oil, for deep-frying and greasing
- Crème patisserie, jam or chocolate spread for filling
- Put the flour, sugar, salt and yeast in the bowl of a stand mixer and stir together. Add the warm milk, orange zest and the eggs and mix with the dough hook attachment at medium speed for about 5 minutes. Use a spatula to scrape down the dough if it starts climbing up the bowl too much. Switch off the mixer and let the dough relax for 5 minutes.
- With the motor running again, add the softened butter, a little at the time. Once it’s all in, continue mixing for 5 minutes at medium speed, until the dough is smooth and shiny.
- Transfer to a lightly oiled bowl, cover with oiled clingfilm and leave to prove at room temperature for 30 mins to 1 hour, until doubled in size. The time it takes will depend on the temperature in your kitchen.
- Lightly grease two baking sheets with oil. Turn the proved dough out onto a very lightly floured work surface and separate the dough into 10 pieces, about 70g each. Then shape them into smooth tight balls, laying them out onto the oiled baking sheets as you go, leaving plenty of space between them. Arrange them neatly, as you’ll be frying them in the order in which they were shaped to control the proving time. Cover with oiled clingfilm and prove again until doubled in size, about 15-20 minutes.
- Heat the oil in a deep saucepan to 160°C, making sure to check the temperature with a thermometer. Fry one or two doughnuts at a time so as not to overcrowd the pan. Carefully lower the doughnuts into the oil and fry for 2 minutes on each side, or until golden brown and puffed up. Drain on a tray lined with kitchen paper.
- Toss the doughnuts in caster sugar while still warm until well-coated, then fill with crème patisserie, jam or chocolate spread.
Galette 340

For the pastry:
- 170g unsalted butter, cubed and chilled in the freezer until hard
- 250g plain flour
- A large pinch salt
- 2 tsp honey
- 2 tbsp chilled water
For the filling:
- 5 pears, halved and cored (skin left on)
- 5 tbsp ground almonds
- 1 tbsp cornflour
- 2 tbsp runny honey
- 1 tbsp lemon juice
- 1 egg, lightly beaten, for glazing
- Demerara sugar, for sprinkling
For the butterscotch sauce:
- 50g unsalted butter
- 100g light muscovado sugar
- 125ml double cream
- A pinch of salt
- For the pastry, place the butter, flour and salt into the bowl of a food processor and pulse until the butter has broken up into breadcrumbs. Add the honey and water and whizz until the pastry comes together, adding an extra 1-2 teaspoons water if needed. Bring the pastry together into a ball and wrap in clingfilm. Chill until firm enough to roll out.
- Roll the pastry out onto a floured work surface – you’re aiming for a rough round about the thickness of a pound coin. Transfer the pastry to a baking sheet lined with parchment paper.
- Combine the ground almonds and cornflour for the filling in a bowl. Leaving a 2-inch (5cm) border, scatter the almond mixture over the pastry. Thinly slice the pears and fan the slices over the pastry in your pattern of choice, then fold the pastry border over the tart, letting the pastry overlap where this happens naturally. Combine the honey and lemon juice and brush this mixture over the pears. Chill in the fridge for at least 30 minutes before baking.
- Preheat the oven to 180°C, 160°C fan. Brush the pastry edge of the tart with egg, then scatter with some demerara sugar. Bake for 40-45 minutes, until the pastry is crisp and golden, covering the tart with a piece of foil if it starts to take on too much colour.
- While the tart bakes, prepare the sauce. Place the all the ingredients in a small saucepan and heat gently until the sugar has dissolved and butter melted. Stir well then bring to the boil and reduce the heat. Simmer gently for 2 minutes and serve warm with the tart
Split Pink 341

Makes 12 cupcakes
For the cupcakes
- 100ml Guinness or stout
- 125g unsalted butter, cubed
- 200g caster sugar
- 1 tsp vanilla bean paste or ½ tsp vanilla extract
- 2 tbsp cocoa powder
- A pinch of fine salt
- 100g plain yoghurt or kefir
- 1 large egg, lightly beaten
- 140g plain flour
- 1 tsp bicarbonate of soda
For the split pink icing
- 100g unsalted butter, softened
- 100g full fat cream cheese
- 300g golden icing sugar
- 50g smooth strawberry or raspberry jam (if you only have a chunky fruit jam, heat slightly, strain and measure 50g strained quantity)
- 1 tbsp lemon Juice
- 2 ½ tsp cocoa
- Preheat the oven to 180°C, 160°C Fan, Gas Mark 4 and line a cupcake tin with 12, paper cupcake cases.
- Heat the Guinness and butter in a medium pan over a medium-low heat, until the butter has melted. Remove from the heat and stir in the sugar, vanilla, cocoa, salt, yoghurt and eggs. Once well combined, fold in the flour and bicarbonate of soda.
- Divide the batter between the paper cases and bake for 35-40 minutes, until risen and springy to the touch. Set aside to cool.
- To make the icing, beat the butter and 150g icing sugar in the bowl of an electric mixer or with a handheld whisk, until smooth. Slowly add the cream cheese and the rest of the icing sugar with the cocoa powder. Loosen the jam with the lemon juice and pour ¾ of the mixture into the icing. Roughly fold through the remaining jam, leaving a rippled effect and use to top the cupcakes. Decorate with a sprinkling of dried raspberry powder, if preferred.
Affogato 342

Somewhere between a coffee and a dessert, an affogato is the perfect way to end a meal.
Simply add a scoop or two of vanilla ice-cream to glasses and top with a shot of espresso. The coffee will quickly start melting the ice cream, so eat what you can with a spoon, then sip the rest.
Muscovado 343
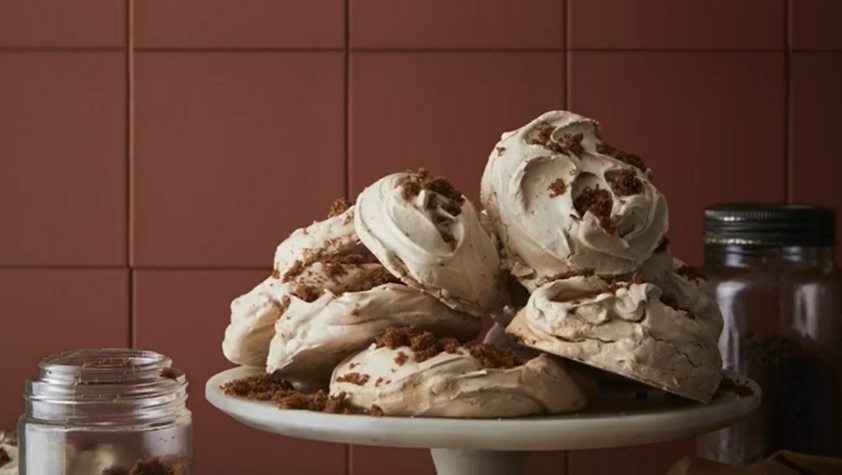
Makes 8 large meringues
- 100g golden caster sugar
- 150g dark muscovado sugar, plus extra for sprinkling
- 4 large egg whites
- Preheat the oven to 150°C, 130°C Fan, Gas Mark 2. Line two oven trays with greaseproof or parchment paper.
- Place all the ingredients in a heatproof bowl over a pan of barely simmering water, making sure the bowl is not touching the water. Whisk with a balloon whisk until all the sugar has dissolved.
- Pour this mixture into the bowl of a stand mixer and whisk on a fast setting for about 8-10 minutes, until the mixture has cooled and is thick, glossy and holds its shape in stiff peaks (if you tip the bowl upside down, the meringue shouldn’t move).
- Drop large spoonfuls of the meringue onto the prepared baking trays.
- Bake for 1 ½ to 2 hours, or until the meringues are crisp and feel dry when you tap their underside. Turn the oven off and leave the meringues to cool in the oven with the door slightly ajar.
Ganache 345

For the cake:
- 280g unsalted butter, softened, plus extra for greasing
- 150g dark chocolate, chopped
- 250g self-raising flour
- 3 tbsp cocoa powder
- A pinch of fine salt
- 5 large eggs
- 260g caster sugar
- 300ml plain yoghurt
- 3 tbsp strong black coffee, cooled
For the ganache buttercream:
- 250g dark chocolate, 70% cocoa
250g double cream, at room temperature - 150g icing sugar
- 150g unsalted butter
- Blackberries and chocolate shaving to decorate.
- Preheat the oven to 190°C, 170°C fan, Gas Mark 5. Grease and line two 3 x 18cm sandwich tins. Melt the chocolate in a heatproof bowl over a pan of barely simmering water, making sure the bowl is not touching the water. Set aside to cool. Sift the flour, cocoa and salt into a medium bowl. In a jug, lightly beat the eggs. Set both aside.
- Beat the butter and sugar in a stand mixer or with an electric whisk, for about 8 minutes until pale and fluffy. With the whisk still running, gradually add the eggs a little at a time until fully incorporated. Gently fold in the flour mixture with a large metal spoon, then the melted chocolate, yoghurt and cooled coffee.
- Divide evenly between the prepared cake tins and smooth the top. Bake for about 30-35 minutes, until the cakes feel firm and springy to the touch and are shrinking away from the side of the tin. Cool in the tins for 5 minutes, then transfer to a wire rack to cool completely.
- Meanwhile, for the ganache icing, put the chopped chocolate in a bowl. Heat the cream in a small pan over a low heat, until steaming but not yet simmering. Pour over the chocolate. Allow to stand for 1 minute then stir to combine; set aside to cool. In a separate bowl, beat the icing sugar and butter until light and fluffy, then stir in the cooled chocolate mixture. Chill until firm but spreadable.
- Assemble the cake by spreading ganache buttercream on top of each cake. Sit the cakes on top of each other to make a three-tier cake, then use a palette knife to spread the icing around the sides and tidy up the top. Decorate with blackberries and chocolate shavings.
Cinnamon Hot Chocolate Recipe

Save this thick, luscious hot chocolate for special occasions – it’s richer than most but will certainly fill you with warmth and comfort.
Serves 2-4
- 450ml whole milk
- 200ml double cream
- 3 tbsp light brown sugar
- 4 tbsp cocoa powder
- ½ tsp ground cinnamon, plus cinnamon sticks to serve
- 250g dark chocolate (70% cocoa solids), finely chopped, plus extra to serve
- Pour the milk and cream into a saucepan, add the brown sugar, cocoa and ground cinnamon. Heat gently stirring occasionally until almost, but not quite, simmering.
- Remove from the heat and drop in the chopped chocolate. Let it sit for 1 minute, then stir until melted and smooth.
- Return to the hob and heat gently to warm through before pouring into 4 mugs. Add a cinnamon stick to each mug and serve with extra chocolate on the side, to melt into your hot chocolate if you like it extra rich.


